How to Create Stunning Mehendi Latest Designs Perfectly
Let’s dive into the mesmerizing world of mehendi, where intricate latest designs transform hands and feet into works of art. Creating beautiful Mehendi Latest Design isn’t just about following patterns; it’s about expressing your creativity and celebrating tradition. This guide will walk you through the steps, offering tips and tricks to achieve those show-stopping looks you’ve been dreaming of.
Gathering Your Supplies: The Artist’s Toolkit
Before you unleash your inner artist, you’ll need the right tools. Think of it as prepping your magical mehndi potion! Here’s what you’ll need:
Essential Mehendi Materials:
- High-quality Mehndi Cone: This is your paintbrush, so choose a cone that’s comfortable to hold and allows for precise application. Many cones are pre-filled, but you can also make your own for a more personalized experience.
- Natural Mehndi Paste: Opt for pure henna paste for the richest color and best results. Avoid cones with added chemicals, as they can impact the quality and longevity of your design. The darker the paste, generally the better.
- Essential Oils (Optional): A few drops of eucalyptus or tea tree oil can help keep the paste moist and improve its staining power.
- Paper Towels or Tissues: These are essential for cleaning up any spills or mistakes, and for creating smooth lines.
- Toothpick or Fine-tipped Pen: For intricate details and corrections, a toothpick can do wonders.
- Eucalyptus Oil: To help your Mehendi Latest Design develop color and improve staining.
Preparing Your Skin: A Smooth Canvas
Just like a painter needs a smooth canvas, your skin needs to be prepped for perfect Mehendi Latest Design application. Here’s how:
- Exfoliate: Gently exfoliate the area where you’ll be applying the mehndi a day or two before. This removes dead skin cells and allows for better absorption of the paste.
- Cleanse: Wash the area thoroughly with soap and water on the day of your application. Ensure your skin is completely clean and dry.
- Avoid Oils and Lotions: Don’t apply any lotions or oils to the area before applying the mehndi, as they can prevent proper staining.
Mastering the Mehendi Application: From Simple to Stunning
Now for the fun part! Applying the mehndi paste requires practice and patience. Start with simple designs and gradually progress to more complex patterns.
- Start with Outlines: Begin by outlining your design lightly with the mehndi cone. Don’t press too hard; a light touch will suffice.
- Fill in the Details: Once the outlines are complete, carefully fill in the spaces with the mehndi paste. Maintain even pressure to create a consistent look.
- Use Different Techniques: Experiment with dots, lines, and swirls to create different textures and visual interests in your Mehendi Latest Design.
- Practice Makes Perfect: Don’t be discouraged if your first few attempts aren’t perfect. Practice on paper or a less visible area first.
Caring for Your Mehendi: Nurturing Your Masterpiece
Once the mehndi is applied, it needs some TLC to achieve the deep, rich color you desire. This stage is crucial for your Mehendi Latest Design!
- Keep it Moist: After the paste has dried completely, you can apply a small amount of eucalyptus oil to help keep the paste moist and aid the staining process.
- Avoid Water: Avoid getting the mehndi wet for at least six to eight hours, or preferably overnight. This allows the paste to fully stain the skin.
- Remove Gently: Once the paste is completely dry (typically after 6-8 hours), gently scrape off the dried paste with a blunt object like a spoon or your fingernail. Avoid scrubbing!
Maintaining Your Mehendi Latest Design: Keeping it Vibrant
To keep your Mehendi Latest Design vibrant for as long as possible, avoid harsh soaps and scrubbing, moisturize regularly to keep your skin healthy, and take pride in your beautiful artwork!
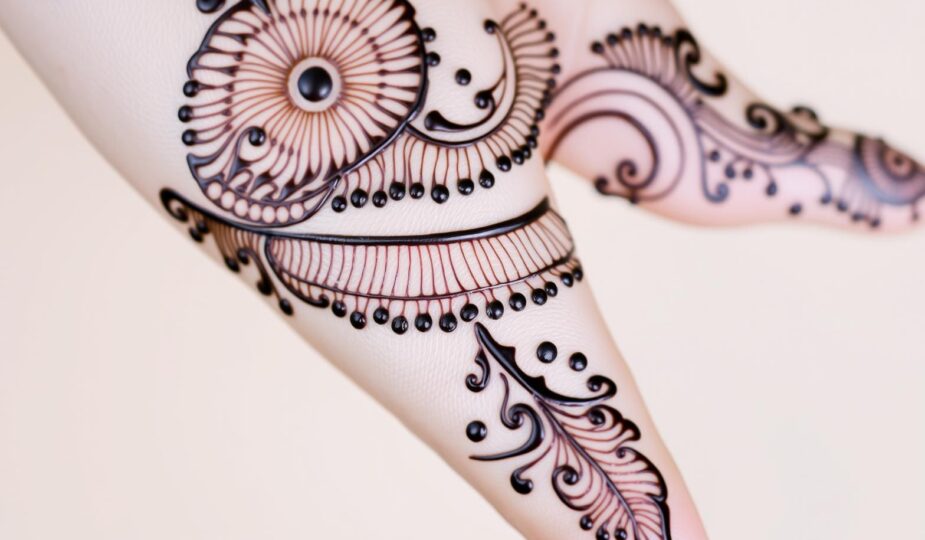
Traditional Mehndi Designs: A Timeless Elegance
Traditional Mehendi Latest Designs often feature intricate floral patterns, paisley motifs, and geometric shapes. These classic designs never go out of style and represent a rich cultural heritage.
FAQs
- Q: How long does it take for the mehndi to stain the skin? A: It usually takes 6-24 hours for the mehndi to fully stain the skin, depending on the quality of the paste and the individual’s skin type.
- Q: How long does the mehndi stain last? A: The duration depends on skin type, aftercare, and the quality of the paste. It can last anywhere from a few days to a couple of weeks.
- Q: What should I do if I make a mistake while applying the mehndi? A: Don’t panic! Use a toothpick or a cotton swab dampened with water to gently remove any excess paste and try to correct the mistake before it dries completely.
- Q: Can I use store-bought cones or should I make my own? A: Both work well! Pre-filled cones are convinient, while making your own allows for more control over consistency and ingredients.
- Q: Where can I find high-quality natural mehndi paste? A: You can find high-quality natural mehndi paste at specialty Indian grocery stores, online retailers specializing in henna, or sometimes even at beauty supply stores.
- Q: How can I make my Mehendi Latest Design last longer? A: Proper aftercare is key! Keep the area moisturized and avoid harsh soaps and scrubbing to extend the life of your design.
So there you have it! With a little practice and patience, you can create stunning Mehendi Latest Designs that will turn heads and celebrate your unique style. Happy creating!